Once lighting and picture quality are in place, height and distance become creative tools—flatter what you love, dial the mood, and stay connected with people watching through the lens.
Studio Setup · Camera angles3 video lessonsRead-along guideFree for models
Part 1
What a good angle is & the “beauty” frame
Why angles are personal, how to think in strengths vs. soft spots, eye-level framing, and talking to the lens.
Lesson video: Part 1—defining a flattering angle and working at eye level.
Lighting tells the camera what it is allowed to see; angle decides how much of you reads as open, confident, and dimensional. The same face can look approachable or harsh depending on a few inches of tripod height—so it pays to treat placement as deliberately as you treat your key light.
This segment is about how working models actually think about angles day to day: not geometry homework, but quick rules that help you connect with whoever is on the other side of the screen.
There is no universal “best” angle
What flatters your friend may flatten you, and vice versa. A useful definition is simpler: a good angle highlights what you want to feature and downplays what you do not want in focus. The lens can either support your silhouette or exaggerate proportions—your job is to steer it toward the first outcome.
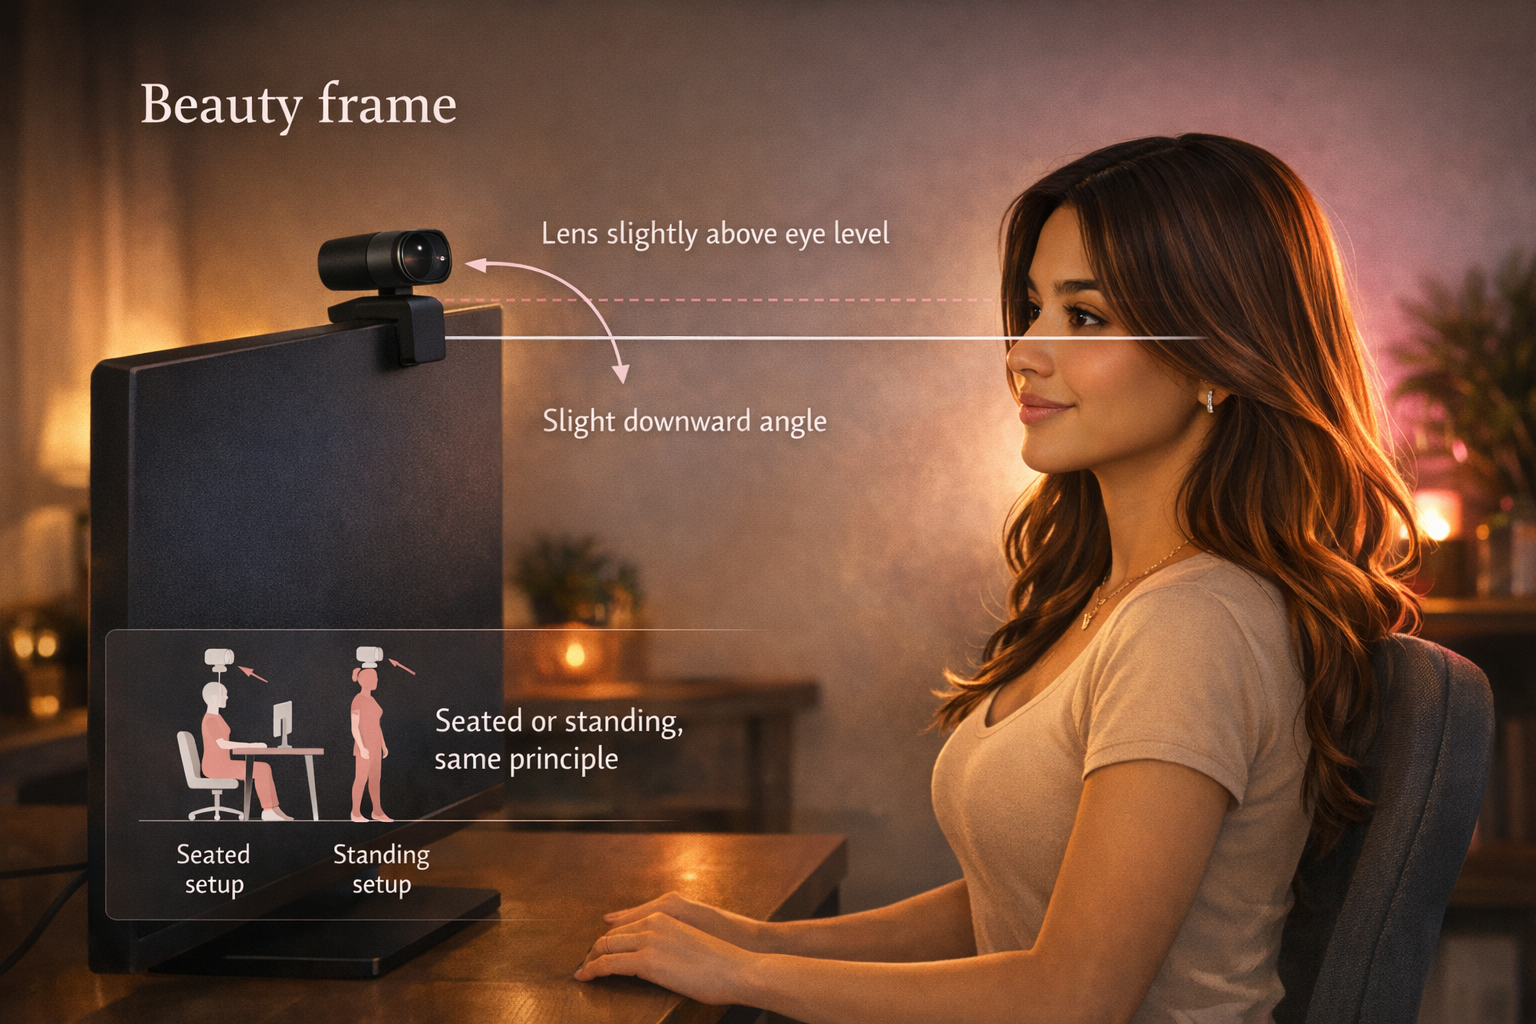
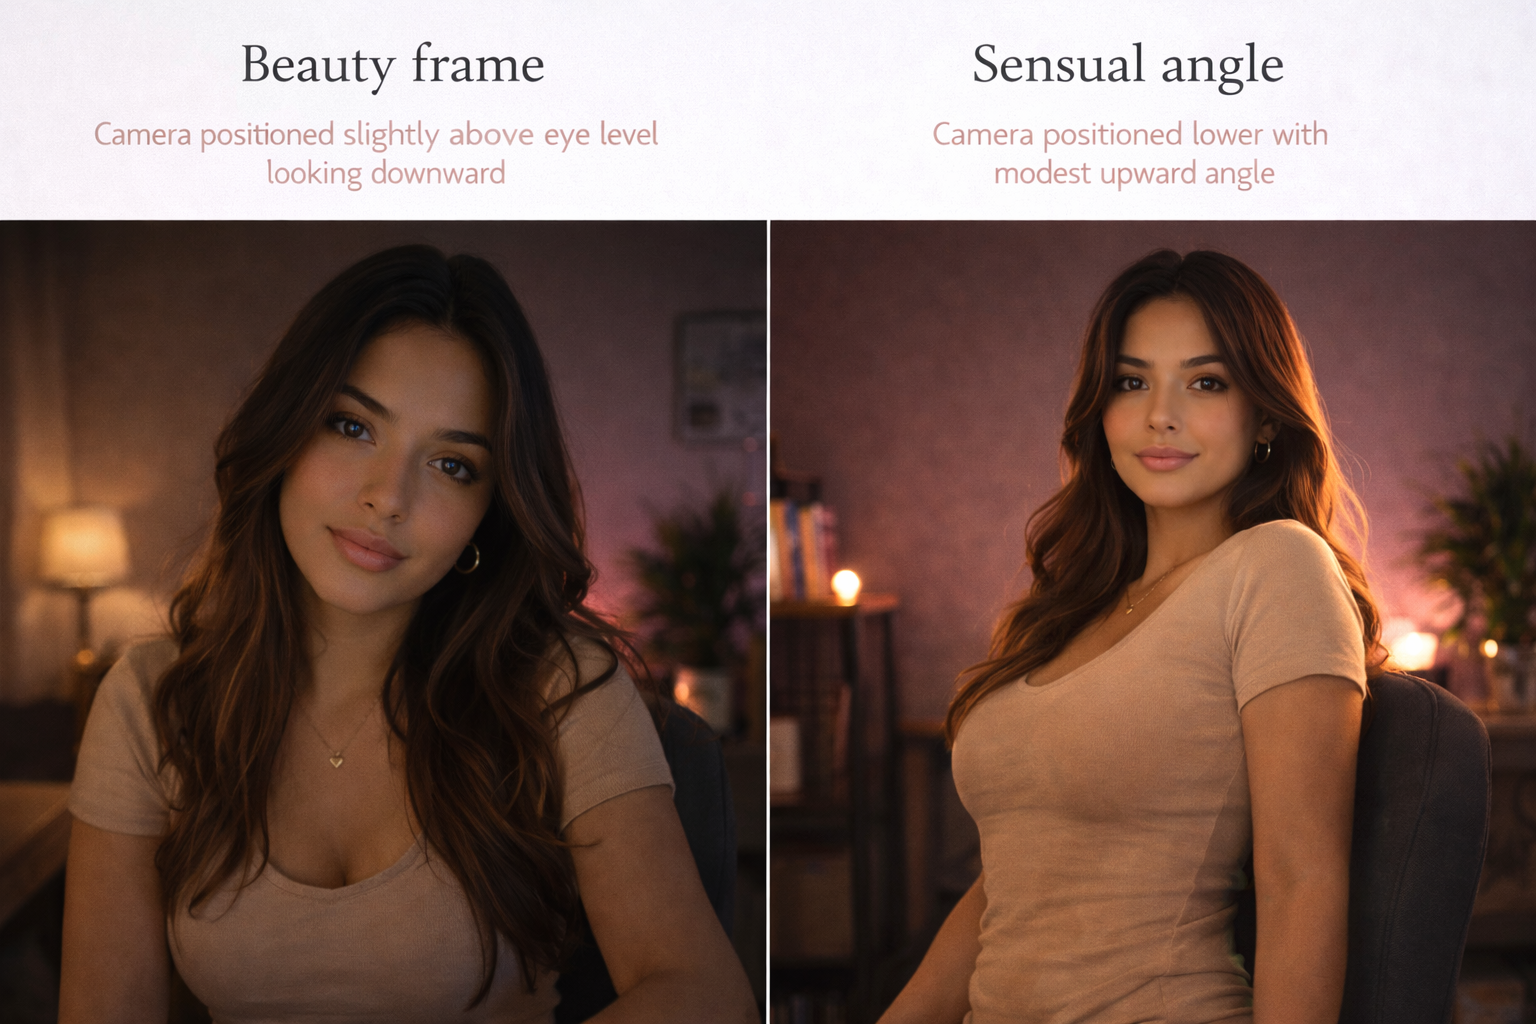
The beauty frame: slightly above eye level
The instructor’s go-to “beauty” setup places the camera just above eye level—a small lift, not a surveillance camera in the corner. From there your features stay balanced, you can still read as “present” with the lens, and your body can read clearly when you widen the shot.
When you are seated, aim for the lens to meet your eyes; same idea standing. That baseline keeps conversation scenes natural: you are not craning up at the device or ducking under it—you are talking to the person watching, and the camera stands in for their viewpoint.
Look at the camera like it is the viewer
Technically the webcam is hardware; emotionally it is the stand-in for everyone in chat. When you speak and glance into the lens, retention and loyalty tend to improve because the room feels seen. Pair that habit with a height you know flatters you, and you get both connection and a polished silhouette.
Part 2
Sensual & body angles, plus the 45° turn
Lower camera positions for mood and legs, and how to rotate your body while keeping your face to the room.
Lesson video: Part 2—sensual framing, legs and waist, and the 45-degree body angle.
After you trust your default beauty frame, you can branch into shots that emphasize mood and shape. The through-line in this section is control: each angle should feel chosen, never accidental, so you stay in charge of how much body and face you show at once.
The sensual angle
Lower the camera to about chest height and let it aim slightly upward. That trajectory lifts eyes, lips, and bust in a way many performers use for slower, more intimate segments—without needing to push into territory that feels off-brand for you.
Think of it as a different emotional register from the beauty frame: still polished, but more weighted toward body language and close-up expression.
Legs and waist: stylize from below the belt line
For fuller-body or pose work, try the camera just under the waist with a modest upward tilt. Legs read longer, hips and curves read more defined, and the same trick often works lying down or seated if you adjust distance.
It is a specialty look—save it for moments when lengthening the lower body matches the show—but when it fits, it is one of the fastest ways to change silhouette without touching lighting.
The 45° body turn
From a medium height (the same band that worked for your beauty frame), rotate your torso about 45° off-axis. You can showcase waist, legs, and chest in one read while keeping the shot dimensional.
Non-negotiable: your face still addresses the camera. The audience is behind the lens—turning your back breaks the conversation even if the pose looks fine in a mirror. Twist the body, not the connection.
This hybrid is why so many veterans default to it: you get stylized body lines and the micro-expressions people stay for—smiles, reactions, lip sync with chat.
Part 3
Mistakes, psychology, tripods & finding your side
Too high, too low, too close, shaky rigs; what those choices signal; rehearsing off-air; discovering your best profile.
Lesson video: Part 3—common mistakes, meaning of high vs low shots, and practice habits.
Small hardware mistakes undo great lighting in seconds. This closing section is a troubleshooting pass—what usually goes wrong first—and then a mindset shift: height and distance are also storytelling tools, not only vanity settings.
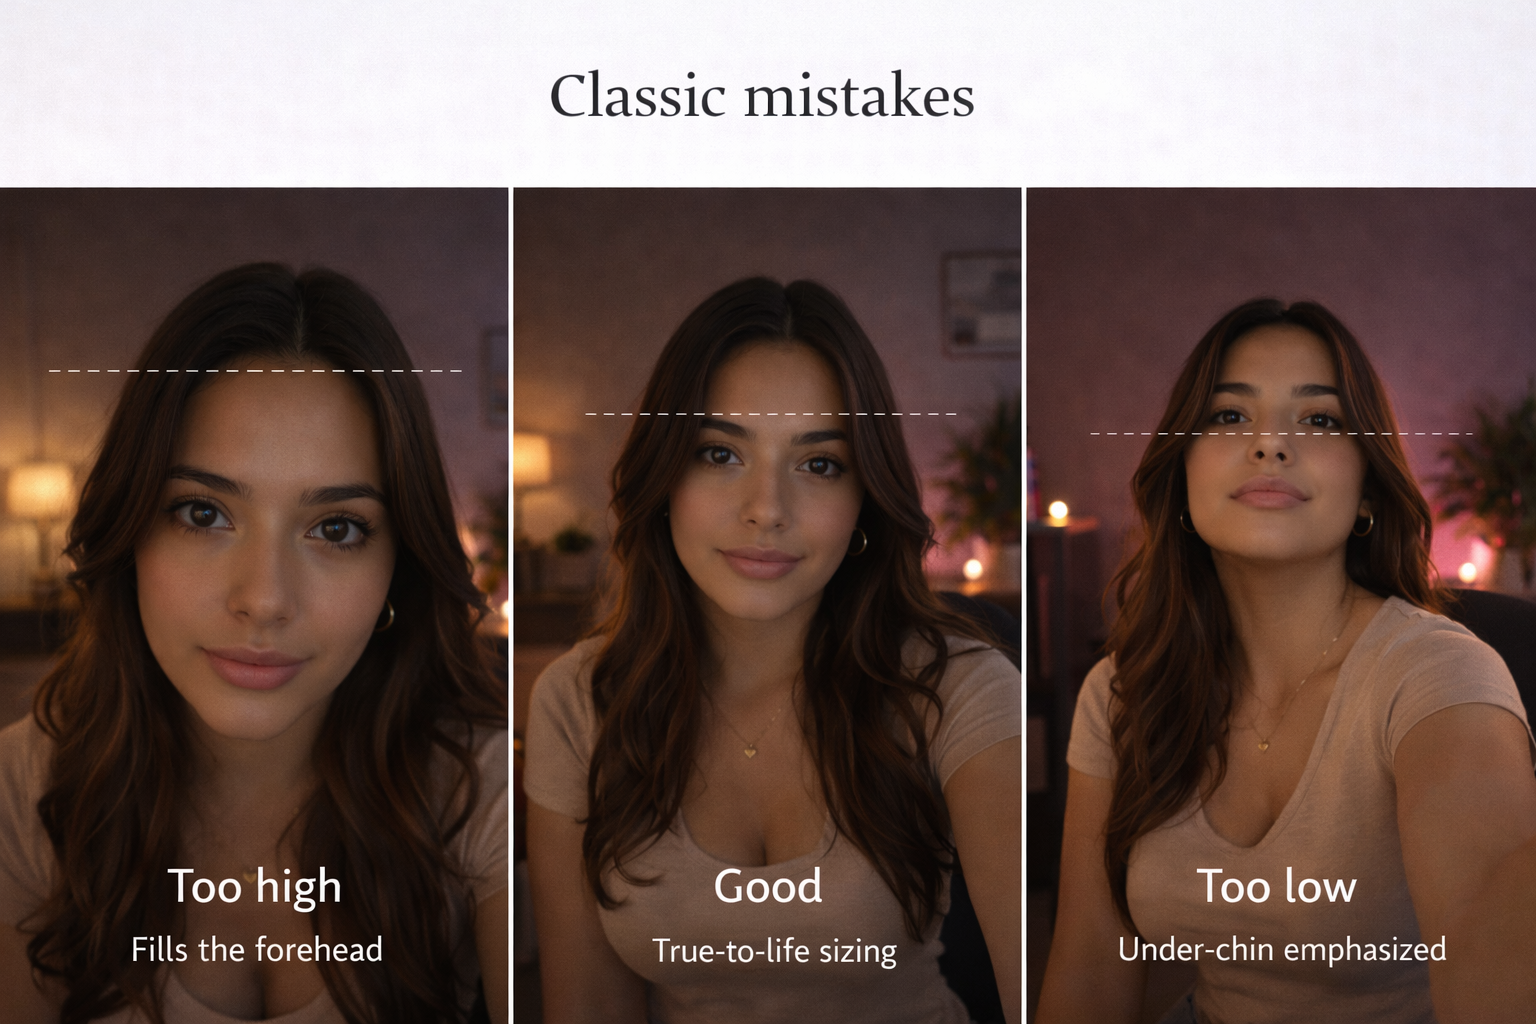
Classic mistakes
Too high: the forehead dominates and proportions skew unnatural. Too low: useful in specific moods, but as a default it can emphasize under-chin area and other spots you may not want forward. Too close: wide-angle distortion stretches facial features. Unstable rig: a frame that drifts or shakes reads amateur fast—tripods, desk arms, or weighted stands are part of angle work, not an optional accessory.
Lock a distance that keeps your body looking like it does in real life: not tiny in the frame, not nose-to-glass with the sensor.
What height whispers to the viewer
Angles carry subtext. A camera above you can make you read smaller or more deferential; below can enlarge your presence and feel more dominant. Mid-height tends to stay neutral and flattering for everyday streaming—the baseline when you are not trying to push power dynamics.
None of that is a rule against experimentation. It is a reminder that when you break the default, you are also choosing a tone. Mix it up on purpose, watch playback, and note what still feels like you.
Rehearse before you go live
Spend a few minutes off-air raising, lowering, and orbiting the camera. Small shifts surface surprises: a half inch might fix a shadow you hated; a new tilt might sell a pose you want to feature. The goal is muscle memory so live shows feel natural, not like you are hunting for focus mid-token.
Find your best side
Most people have a slightly stronger profile or expression on one side—or straight-on may be your hero angle. Test in your actual chair, with your real lights. Once you know whether left, right, or center wins, you can bias tripod placement and body turns so the camera spends more time on your strongest read.
Angles as part of your brand
Models who obsess over stream craft—light, stability, framing—tend to stand out because the room feels intentional. Angles are one of the lowest-cost upgrades you can make: often it is just a knob, a hinge, or a different shelf. Stack those choices with everything else you have learned here, and the room starts to feel unmistakably yours.
Continue the guided path
Return to All Lessons for the next step in the sequence. You can still open a unit hub anytime if you want to deep-dive a single topic.